
Your home’s curb appeal is significantly influenced by the condition of your asphalt driveway. A well-maintained driveway not only enhances your home’s exterior appearance but also increases its overall value.
Sealing your asphalt driveway creates a protective layer that shields the surface from damaging elements like UV rays, oil, and water. This process is crucial for extending the lifespan of your driveway.
By applying a protective layer, you can preserve your driveway’s surface and maintain its rich, dark finish. Whether you’re considering a DIY approach or hiring professionals, understanding the benefits and application process of sealcoating is essential for protecting your investment.
Table of contents
- Understanding Driveway Sealcoating and Its Benefits
- When to Sealcoat Your Asphalt Driveway
- Choosing the Right Driveway Sealer
- Preparing Your Driveway for Sealcoating
- The Driveway Sealcoating Process
- DIY vs. Professional Driveway Sealcoating
- Maintaining Your Newly Sealcoated Driveway
- Driveway Sealcoating Conclusion
- Driveway Sealcoating FAQs
Understanding Driveway Sealcoating and Its Benefits

A well-maintained driveway starts with understanding the benefits of sealcoating. Your driveway is one of the first things people notice when they approach your home, making its condition a significant factor in your home’s curb appeal.
What Is Driveway Sealcoating?
Driveway sealcoating is a protective layer applied to your asphalt driveway to shield it from the elements. This layer helps to prevent damage from UV rays, water, and other environmental factors that can deteriorate the asphalt over time. By sealing your driveway, you’re taking a proactive step in maintaining its integrity and appearance.
The Protective Power of Sealcoating
Sealcoating acts as a barrier against water, oil, and other substances that can seep into the asphalt and cause damage. By protecting your driveway from these elements, you can extend its lifespan and reduce the need for costly repairs. Regular sealcoating can also help to prevent cracks and potholes from forming.
Curb Appeal and Property Value Enhancement
A freshly sealcoated driveway can dramatically improve your home’s curb appeal. The rich, dark finish looks clean and well-maintained, creating a positive first impression. This can be particularly important if you’re planning to sell your home, as a well-maintained driveway can significantly impact potential buyers’ perceptions. Here are some key benefits:
- A uniform, attractive appearance that enhances your property’s aesthetic.
- Increased resale value due to a well-maintained driveway.
- A demonstration of pride of ownership and attention to detail in home maintenance.
- A protective layer that shields your driveway from environmental damage.
- A freshly sealcoated driveway that looks neat and well-maintained.
When to Sealcoat Your Asphalt Driveway
To keep your asphalt driveway in top condition, it’s essential to know when to apply sealcoating. Sealcoating is not just a cosmetic improvement; it’s a protective measure that extends the life of your driveway.
Signs Your Driveway Needs Sealcoating
If you notice that your driveway is starting to crack, fade, or show signs of wear, it’s likely time for sealcoating. Regular inspections can help you catch these signs early.
Optimal Weather Conditions for Sealcoating
The best time to sealcoat is during dry, mild weather. Avoid applying sealcoating during extreme temperatures or when rain is forecasted.
How Often Should You Sealcoat?
Ideally, you should sealcoat your driveway every 2 to 3 years. However, if your driveway is exposed to heavy traffic, chemicals, or harsh weather conditions, consider sealcoating every 2 years. For new driveways, wait until the asphalt is fully cured, usually after 90 days.
| Driveway Condition | Sealcoating Frequency |
|---|---|
| Normal Traffic | Every 2-3 years |
| Heavy Traffic or Harsh Conditions | Every 2 years |
| New Driveway | After 90 days |
Choosing the Right Driveway Sealer
Selecting the ideal driveway sealer is crucial for maintaining your asphalt surface’s integrity and appearance. With various options available, understanding the different types and their applications is essential.
Types of Driveway Sealers
Driveway sealers come in several formulations, each with its benefits and ideal applications.
Asphalt-Based Sealers
These sealers are made from asphalt and are known for their durability and compatibility with asphalt driveways.
Coal Tar Sealers
Coal tar sealers offer superior protection against water and UV damage, making them a popular choice.
Acrylic Sealers
Acrylic sealers are known for their ease of application and quick drying times, enhancing the appearance of your driveway.
Fast-Drying Sealers
Fast-drying sealers are ideal for areas with high traffic, minimizing downtime.
Factors to Consider When Selecting a Sealer
When choosing a driveway sealer, consider factors such as durability, drying time, and environmental impact. Quality is paramount to ensure your driveway remains protected and looks its best.
Commercial vs. Residential Grade Sealers
Commercial-grade sealants are formulated to withstand heavier traffic and extreme conditions, making them suitable for driveways that experience high usage. Key benefits include:
- Superior durability due to higher concentrations of solids and specialized polymers.
- Long-term cost-effectiveness despite a higher initial cost.
- Enhanced protection against various environmental factors.
For the best quality sealant, consider commercial-grade options to improve your driveway’s appearance and preserve its structure.
Preparing Your Driveway for Sealcoating
Before applying sealcoating, your driveway needs to be properly prepared to ensure a successful and long-lasting result. Proper preparation involves several key steps that will be outlined in this section.
Tools and Materials Needed
To start, gather the necessary tools and materials. You’ll need a broom, a leaf blower, a pressure washer, asphalt crack filler, and a degreaser for oil stains. Having the right equipment is crucial for a thorough preparation.
Cleaning the Driveway Surface
Begin by sweeping the driveway to remove loose debris. Then, use a pressure washer to clean the surface thoroughly. This step is essential for removing dirt and grime that can interfere with the sealcoating process.
Repairing Cracks and Potholes
Next, address any cracks or potholes using an asphalt crack filler. Fill in the damaged areas and allow the filler to dry completely before proceeding.
Addressing Oil Stains and Other Contaminants
For oil stains, apply a degreaser to the affected area, let it sit for the recommended time, and then scrub and rinse. For other contaminants like moss or algae, use a bleach solution (1:4 ratio) before pressure washing the surface. Ensuring the driveway is free of contaminants is vital for the sealcoating to adhere properly.
- Oil stains require special attention as they can prevent proper adhesion of the sealant—apply a specialized asphalt degreaser and allow it to penetrate the oil for the time specified on the product.
- After the degreaser has had time to work, scrub the area vigorously with a stiff bristle brush and rinse thoroughly, possibly repeating the process for severe stains.
- For organic contaminants like moss or algae, apply a solution of bleach and water (1:4 ratio) to kill the growth before pressure washing the surface.
- Chemical spills may require specialized cleaners depending on the substance—identify the contaminant and select an appropriate cleaner that won’t damage the asphalt.
- After treating all stains and contaminants, perform a final rinse of the entire surface and allow it to dry completely before proceeding with the sealcoating process.
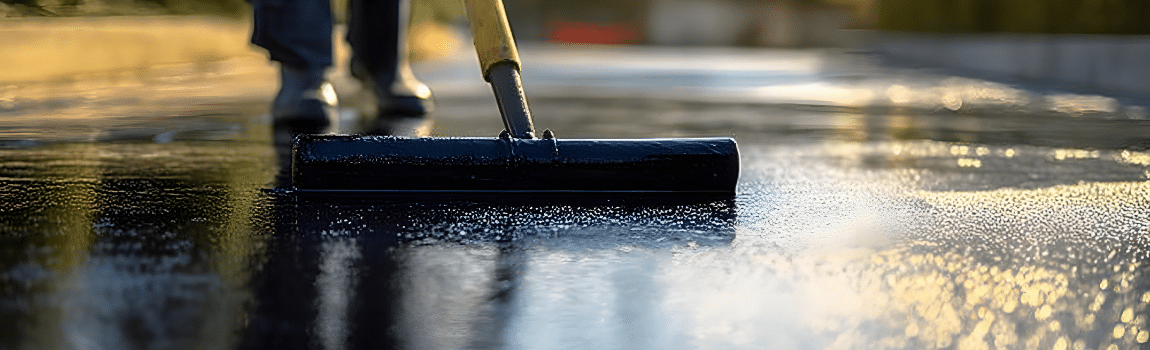
The Driveway Sealcoating Process
The driveway sealcoating process is a straightforward yet crucial step in maintaining your asphalt driveway’s integrity and appearance. To achieve the best results, it’s essential to understand the various stages involved in this process.
Step-by-Step Application Guide
Applying sealant to your driveway involves several key steps. First, ensure that your driveway is clean and free of debris. Then, pour the sealant into a squeegee or applicator and spread it evenly across the surface. For best results, most professionals recommend applying two thin coats rather than one thick coat. This approach provides superior protection and a more uniform appearance.
Applying Edges and Detailed Areas
When applying sealant, pay special attention to the edges and detailed areas of your driveway. Use a brush or smaller applicator to ensure these areas are thoroughly coated. This attention to detail will help prevent water from seeping into the asphalt and causing damage.
Drying and Curing Times
After applying the sealant, it’s crucial to allow it sufficient time to dry and cure. The drying time can vary depending on weather conditions, but typically, you should wait at least 2-4 hours before allowing traffic on the driveway. As noted by a sealcoating expert, “Patience is key when it comes to allowing the sealant to dry and cure properly.”
“A well-maintained driveway not only enhances your home’s curb appeal but also protects your investment for years to come.”
When to Apply a Second Coat
For new driveways or those with highly porous surfaces, it’s often recommended to apply a second coat. When doing so, make sure the first coat is completely dry to the touch but still within the manufacturer’s recommended window for recoating. Apply the second coat perpendicular to the first to ensure even coverage. Using slightly less sealant for the second coat can help prevent over-application and surface issues.
By following these steps and guidelines, you can achieve a professional-looking finish and enjoy the benefits of a well-maintained driveway.
DIY vs. Professional Driveway Sealcoating
You have two primary options for driveway sealcoating: taking on the task yourself or employing a professional service.
Pros and Cons of DIY Sealcoating
DIY driveway sealcoating can be cost-effective, with materials costing between $0.15-$0.30 per square foot. However, it requires preparation, the right tools, and knowledge of the application process. If done incorrectly, it may lead to premature sealant failure.
When to Hire a Professional
Hiring a professional ensures a high-quality finish and longevity of the sealcoating. Professionals have the necessary equipment and experience, and their services often come with a warranty.
Cost Comparison: DIY vs. Professional Services
The cost of DIY sealcoating for a 500 square foot driveway can range from $75-$150, plus equipment costs. Professional services for the same area can cost $125-$250. While DIY is initially cheaper, consider the long-term benefits and potential costs of reapplication if done improperly.
Maintaining Your Newly Sealcoated Driveway
To keep your newly sealcoated driveway in top condition, regular maintenance is essential. After your driveway has fully cured, start with routine sweeping to remove debris that can scratch or damage the sealed surface.
- Address any fluid leaks or spills promptly by blotting and cleaning with a mild detergent.
- Inspect your driveway every few months for early signs of wear or damage, especially after severe weather events.
- Avoid using metal shovels on your sealed asphalt driveway during winter months; instead, opt for plastic snow removal tools.
Regular maintenance, such as cleaning the surface and inspecting for damage, will help extend the life of your sealcoating. Reseal your driveway every two to three years or as recommended by the sealant manufacturer.
Driveway Sealcoating Conclusion
Ultimately, sealcoating is a cost-effective investment in your driveway’s longevity and your home’s overall value. By protecting your asphalt driveway from damage and enhancing its appearance, you can significantly boost your home’s curb appeal. Whether you opt for a DIY approach or hire professionals to seal your driveway, the key to success lies in proper preparation and quality materials. Regular sealcoating can potentially double the lifespan of your driveway, saving you from costly repairs. By following the guidelines outlined in this article, you can make informed decisions about maintaining your driveway with the right sealant.
Driveway Sealcoating FAQs
The time it takes for the sealer to fully cure depends on the type of sealer used and the weather conditions. Typically, it can take anywhere from a few hours to a few days for the sealer to fully cure. It’s recommended to wait at least 24 hours before exposing your asphalt surface to traffic or rain.
Yes, you can sealcoat your asphalt driveway yourself, but it’s essential to follow the manufacturer’s instructions and take necessary safety precautions. Make sure to clean the surface thoroughly, repair any cracks, and apply the sealer in the right weather conditions.
The ideal temperature for applying sealant is between 50°F and 90°F. Applying sealant in extreme temperatures can affect its adhesion and drying time. It’s also crucial to avoid applying sealant in direct sunlight or during rain.
The frequency of sealcoating depends on various factors, including the amount of traffic, weather conditions, and the quality of the sealer used. As a general rule, it’s recommended to sealcoat your asphalt driveway every 2-3 years to maintain its protective layer.
No, it’s not recommended to sealcoat over oil stains or other contaminants. These substances can interfere with the adhesion of the sealer, reducing its effectiveness. Instead, clean the area thoroughly with a degreaser before applying the sealer.


1 Comment
Comments are closed.