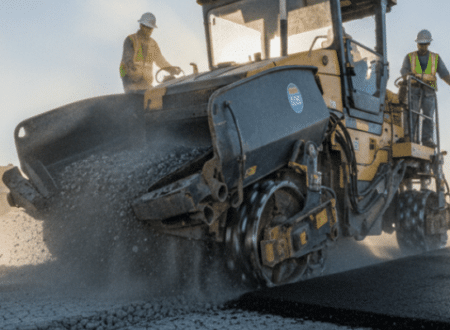
Your driveway is more than just a path to your home; it’s a significant investment that requires regular maintenance to ensure its longevity. One crucial aspect of this maintenance is asphalt sealing coating, a process that protects your driveway from damage caused by various elements.
By applying a protective layer, you shield your driveway from harmful UV rays, water, oil, and chemicals, thereby extending its lifespan and enhancing its appearance. A well-maintained driveway not only boosts your home’s curb appeal but also provides a smoother surface that’s easier to clean.
Understanding the importance of regular sealing can save you thousands in potential repair and replacement costs over your driveway’s lifetime. This comprehensive guide will walk you through the process, from preparation to application and maintenance, ensuring you have all the information needed to revitalize your driveway.
Table of contents
- Why Your Driveway Needs Asphalt Seal Coating
- When to Schedule Your Asphalt Seal coating Project
- Essential Tools and Materials for Asphalt Seal coating
- Preparing Your Driveway for Sealing
- The Asphalt Sealing Process: Step-by-Step Guide
- DIY vs. Professional Asphalt Sealing
- Asphalt Sealing in Colorado Springs Conclusion
- Asphalt Sealing in Colorado Springs FAQs
Why Your Driveway Needs Asphalt Seal Coating
Sealing your driveway is a crucial step in protecting it from environmental damage. Your asphalt driveway is constantly exposed to various elements that can deteriorate its surface over time.
Protection Against the Elements
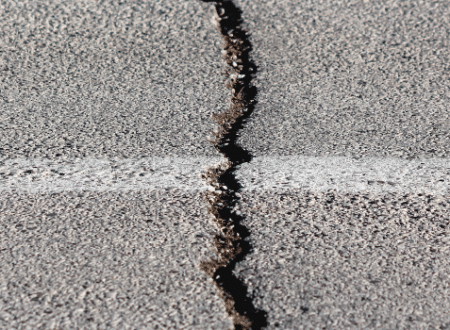
The sun’s UV rays cause oxidation, breaking down the binding agents in asphalt and leading to a weakened structure. Water penetration, especially during freeze-thaw cycles, can create cracks and potholes. Regular sealing creates a waterproof barrier, reflecting harmful UV rays and preventing moisture penetration.
Extending Your Driveway’s Lifespan
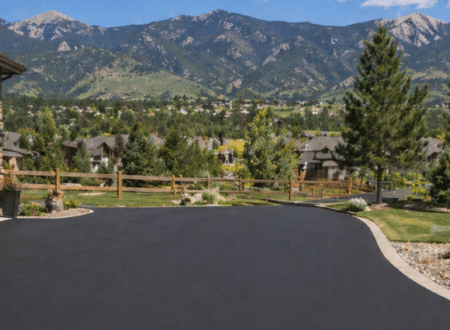
By seal coating your driveway, you significantly extend its lifespan. A sealed driveway is smoother and easier to clean, preventing oil, gas, and other substances from penetrating the surface. This maintenance enhances your home’s curb appeal and can increase property value.
| Benefits of Asphalt Sealing | Description |
|---|---|
| Protection Against UV Rays | Prevents oxidation and weakening of asphalt |
| Waterproof Barrier | Prevents water penetration and damage |
| Enhanced Curb Appeal | Improves the appearance of your home |
Seal coating your driveway is a cost-effective way to protect your investment. The expense of complete replacement can be 5-10 times higher than regular maintenance, making sealing a worthwhile investment for homeowners.
When to Schedule Your Asphalt Seal coating Project
Scheduling your asphalt sealing project at the right time is crucial for its success. The condition of your driveway and the weather play significant roles in determining the ideal time for sealing.
Ideal Weather Conditions
The ideal time to seal your driveway is when the temperature reaches at least 50 degrees Fahrenheit. “Warm weather is essential for the sealant to cure properly,” ensuring a durable and long-lasting finish. Spring and summer months typically provide the best conditions for sealing, allowing the sealant to bond well with the asphalt surface.
Signs Your Driveway Needs Sealing
Visual indicators that your driveway needs sealing include fading from black to gray, small cracks appearing, rough texture, and water no longer beading on the surface. Inspecting your driveway annually will help determine if sealing is needed earlier than the standard recommendation.
How Often to Seal Your Driveway
Most experts recommend seal coating your driveway every 2-3 years, though this can vary based on climate, usage, and exposure to harmful elements. If your driveway gets a lot of traffic or is constantly exposed to chemicals, snow, or oils, consider sealing it once every 2 years to maintain optimal protection.
Essential Tools and Materials for Asphalt Seal coating
To achieve professional-quality results in asphalt seal coating, you need to select the appropriate tools and materials.
Choosing the Right Asphalt Sealer
There are several types of asphalt sealers available, each with its specific benefits. Asphalt-based sealers are known for their durability and protection against oil and gas spills. Coal tar sealers offer excellent water resistance but are not the most eco-friendly option.
For most residential driveways, a premium asphalt-based sealer provides the best balance of protection, environmental safety, and ease of application. Acrylic sealers, on the other hand, are more suited for concrete driveways due to their superior UV protection.
Required Equipment Checklist
To apply the sealer effectively, you’ll need the right equipment. Essential tools include an asphalt squeegee or brush applicator for even distribution, a leaf blower for cleaning the surface, and a stiff brush for edges and detailed areas.
Safety equipment is also crucial – gloves, eye protection, and appropriate footwear are necessary when working with asphalt sealers. For larger driveways, consider using a sealcoat sprayer for more efficient application.
Preparing Your Driveway for Sealing
To ensure a long-lasting seal, your driveway needs to be thoroughly prepared. Proper preparation is the most critical step in the asphalt sealing process, directly impacting the durability and appearance of the finished result.
Thorough Cleaning Techniques
Begin by thoroughly cleaning the entire driveway surface to remove all dirt, debris, and loose material that could prevent proper adhesion of the sealer. Use a combination of a leaf blower for loose debris and a pressure washer for stubborn dirt and grime, working from the highest point of the driveway downward.
Addressing Oil Stains and Grease
Oil and grease stains require special attention as they can prevent sealer adhesion and cause discoloration. Apply a specialized asphalt degreaser and scrub with a stiff brush to remove these stains effectively.
Repairing Cracks and Potholes
Inspect the entire area for cracks and damage. Small cracks (less than ¼ inch) can be filled with crack filler, while larger cracks may require an asphalt repair compound. Address potholes by cleaning out loose debris, applying an asphalt patch compound, and compacting it firmly until level with the surrounding surface.
Make sure all repairs have fully cured according to manufacturer specifications before proceeding with the sealing application. Additionally, trim grass and vegetation along the edges of your driveway to prevent overgrowth onto the newly sealed surface and to create clean, defined borders.
The Asphalt Sealing Process: Step-by-Step Guide

Applying asphalt sealer to your driveway is a straightforward process that requires attention to detail. To achieve a smooth, even seal coat that provides maximum protection, follow these steps carefully.
Mixing and Preparing the Sealer
Before you start applying the sealer, make sure to mix it according to the manufacturer’s instructions. Each bucket of driveway sealer will have a label stating how much asphalt it’ll typically cover with one coat. Thorough mixing ensures consistent texture and color throughout the application. Proper preparation is key to a successful sealcoating driveway project.
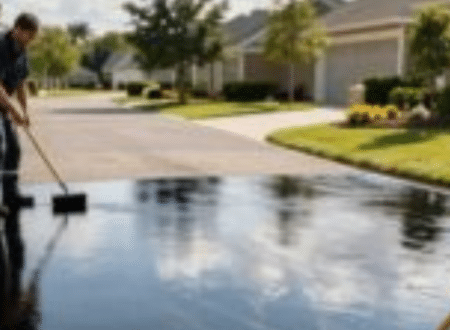
Application Techniques for Even Coverage
To apply the sealer evenly, start at the highest point of your driveway and work your way down. Divide your driveway into manageable sections of approximately 10×10 feet to maintain a wet edge and achieve uniform coverage. Pour a small amount of sealer onto the driveway and spread it evenly with your applicator, overlapping slightly for full coverage. Pay special attention to the edges, which may require a brush for precise application.
Applying Multiple Coats for Maximum Protection
For maximum protection, consider applying two thin coats of driveway sealer. Two thin coats dry more evenly and provide more protection than a single thick coat. Allow the first coat to dry completely, typically 4-8 hours depending on temperature and humidity, before applying the second coat. When applying multiple coats, change the direction of application to ensure complete coverage.
Critical Drying and Curing Time
The critical drying time between coats is typically 4-8 hours, but the full curing process takes 24 to 48 hours before you can use your driveway for vehicle traffic. Make sure to block off your driveway to prevent accidental use before the sealant has fully cured. Temperature and humidity significantly impact drying time, so be patient and allow extra time if necessary.
| Drying Factor | Time Required | Conditions Affecting Time |
|---|---|---|
| Drying Time Between Coats | 4-8 hours | Temperature and Humidity |
| Full Curing Time | 24-48 hours | Temperature, Humidity, and Traffic |
By following these steps and allowing sufficient time for drying and curing, you’ll ensure a successful asphalt sealing project that protects your driveway for years to come.
DIY vs. Professional Asphalt Sealing
Homeowners considering asphalt sealing must weigh the pros and cons of DIY versus professional services. The decision hinges on factors like budget, time constraints, and the condition of your driveway.
Cost Comparison
The cost is a significant factor. DIY sealing costs between $0.15-$0.30 per square foot for materials, while professional services range from $0.50-$0.80 per square foot. For a 1,000 square foot driveway, this translates to $150-$300 for DIY versus $500-$800 for professional application.
Time and Effort Considerations
DIY sealing requires a substantial time investment – 1-2 days for preparation and application, plus research and purchasing supplies. In contrast, professional crews can complete the job in 4-6 hours with superior equipment and techniques.
When to Call the Professionals
Consider hiring professionals if your driveway has significant damage, a steep slope, or if you’re physically unable to handle the labor-intensive process. Make sure to research any professional company thoroughly, checking reviews and asking for references before hiring them to seal your driveway.
Asphalt Sealing in Colorado Springs Conclusion
To keep your asphalt driveway in top condition, regular maintenance is key. This includes cleaning the surface regularly with a broom or leaf blower and washing with a mild detergent every few months.
It’s also crucial to clean up any oil or gas spills promptly and inspect your driveway annually for new cracks or damage. Reseal your driveway every two to three years or as recommended by the sealant manufacturer to maintain optimal protection.
Don’t wait until your driveway or parking lot shows serious wear. At Hammers Sealcoat & Asphalt, we offer expert asphalt seal coating in Colorado Springs that extends the life of your surface and enhances curb appeal. Get a free quote today and see how affordable long-term protection can be.
Asphalt Sealing in Colorado Springs FAQs
The sealer typically takes at least 24 to 48 hours to fully cure, depending on the weather conditions and the type of sealer used. It’s essential to avoid driving or parking on the sealed surface during this time to ensure a proper bond.
While it’s possible to seal coat your driveway yourself, hiring a professional is recommended if you’re not experienced with the process. Professionals have the necessary equipment and knowledge to ensure a proper application and achieve the best results.
The ideal temperature for applying driveway sealer is between 50°F and 90°F. Applying sealer in extreme temperatures can affect its adhesion and drying time.
It’s recommended to seal your driveway every 2 to 3 years, depending on the amount of traffic and weather conditions it is exposed to. Regular sealing helps maintain the integrity of your driveway and extends its lifespan.
Signs that your driveway needs to be sealed include cracks, fading color, and oil stains. If you notice any of these signs, it’s a good idea to seal your driveway as soon as possible to prevent further damage.